Welcome!

Glad you could join me. I'm stitching a life together bit by bit.

Thursday, January 2, 2014

Wool Embroidery on a Sewing Kit

This past December, my art friends and I did a little Secret Santa gift exchange.  I made a wool & cotton sewing kit for my friend Lulu.  

I used Sue Spargo's Greta Needle Roll pattern as the basis for the kit and then modified it a bit from there.  For the front, I used Sue's flower design instead of the plant that is shown in the pattern.  I added an extra inner pocket, the inner flower, modified the name plate on the back of the kit and a few other things.  

I used one of the greeting cards that Lulu designed, featuring her own art work (the girl with cat on her head), and turned it into a hand bound book with 2 signatures.  It fits perfectly into one of the large pockets.

This was my first time putting in a zipper, and there are 2 zippered pouches  inside the kit.  These were also the first bees and ladybugs that I made with embroidery.

The stitches I used are detailed below.

Front of the needle roll.


Orange/Yellow Flower:
Turkey work with Shepherd's Silk
Coral stitch with beads and Spaghetti thread
Seed stitch with Valdani
Single cast on with Valdani
French knot with chenille
Crested chain and bullions with Valdani


Purple/Pink Flower:
Drizzle stitch with Valdani
Pistil stitch with Valdani
French knot with Chenille
Bullion with Silken Pearl
Fly stitch with hand dyed silk ribbon 
Palestrina knot with hand dyed Pearl Cotton #5 from Sue Spargo


A little blurry on the bees, but they only stay still for a second.


Back of the needle roll.  There is space here to write the owners name with a fabric pen or stitching.


The outside of the needle roll. 


Cat girl mini book I stitched together using Lulu's card featuring her own painting.


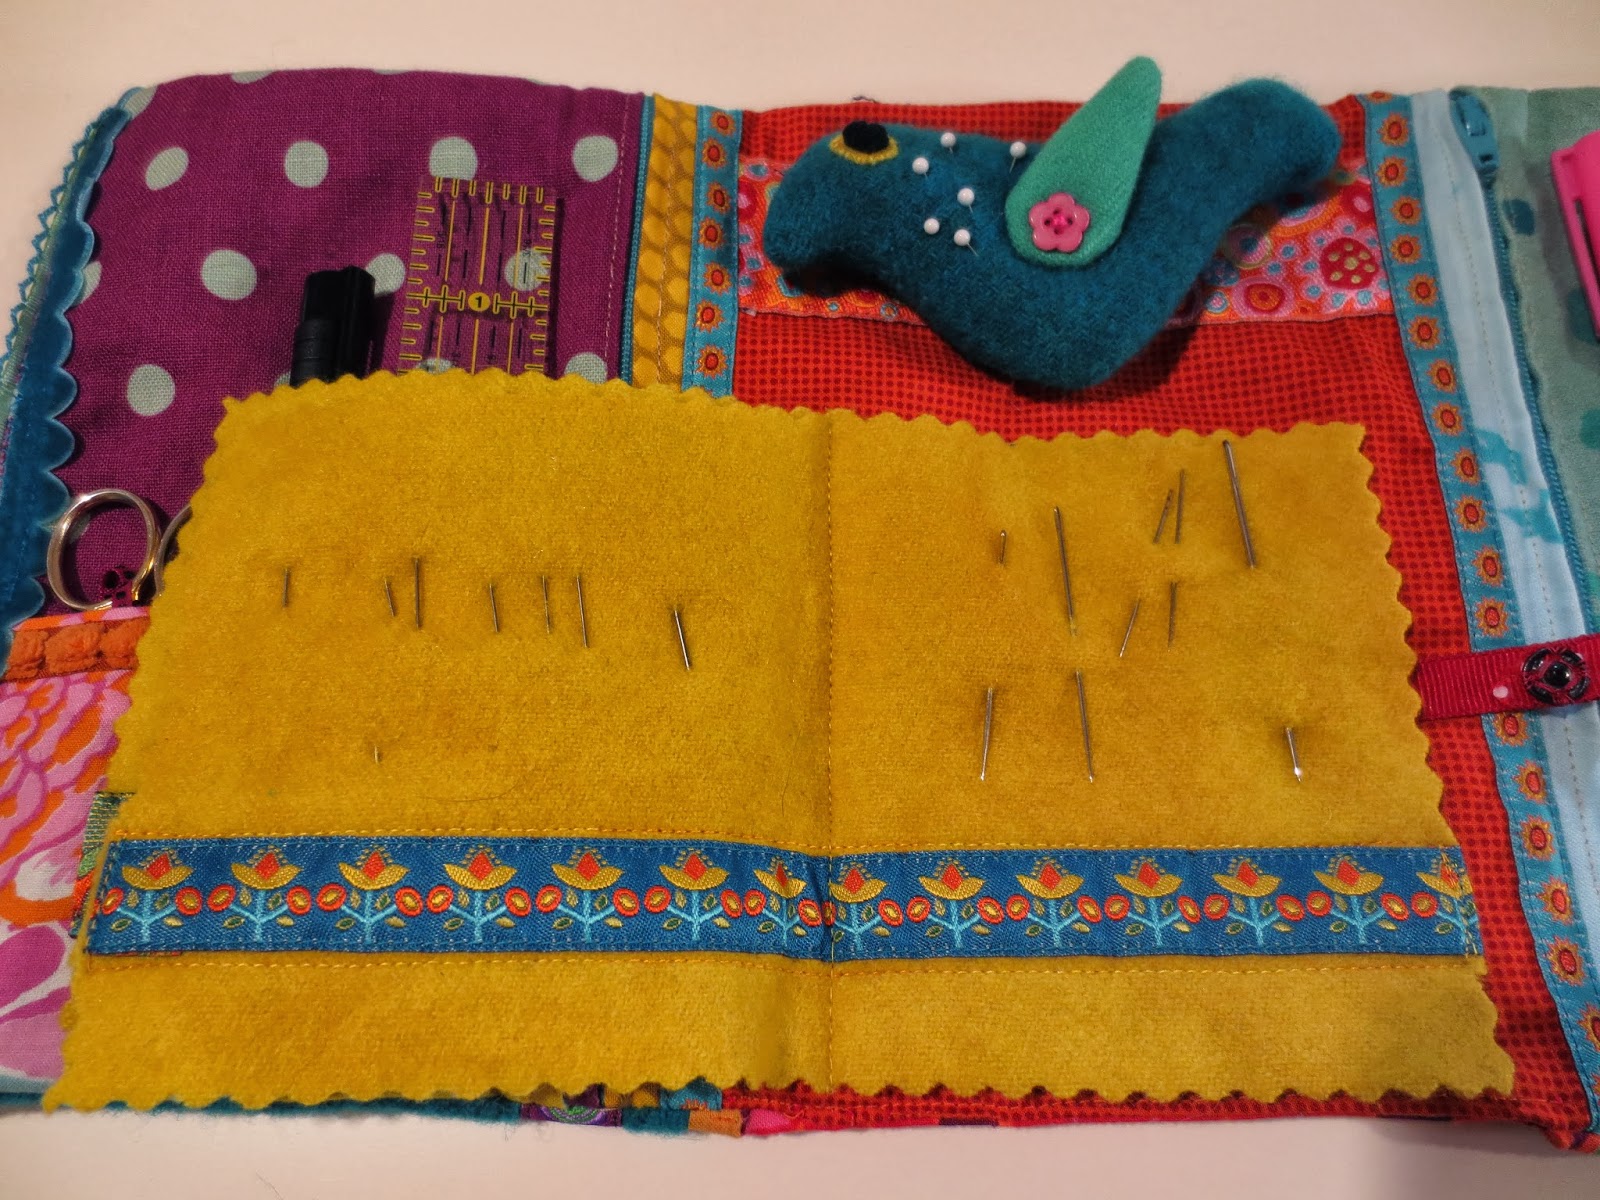
Inside of the needle roll, featuring pockets for scissors, pen, ruler and a notepad.  


Zippered pockets on the left and right hold more items.


Bird pin cushion and wool needle book keep things in place.


I added a second small pocket and a mini embroidered flower on the right side.


Bird Pin Cushion:
Bullions for the black eye.


Small pink inside flower:
French knot with Valdani
Single cast on with Valdani
French knot with chenille
Bullion with Valdani


Heart on the needle keeper:
French knots in chenille
Bullions in Silken Pearl
Pistil stitch in Valdani
Back stitch of blue Chenille


Three different types of Sue Spargo ribbon used 
in the needle book.


A very quick signature done just minutes before 
presenting my gift.


Lulu - delighted with her gift!


Friday, October 11, 2013

A Little Bit About ATCs


ATC:  Artist Trading Cards


ATC's are 2 1/2 inch by 3 inch cards with some type of art on at least one side and typically info about the artist, the title of the card, the date it was made, and the email and/or blog/website of the artist on the back.

I like them made out of watercolor paper, b/c it can handle anything - water color, paint, gesso, markers, stitching, etc...

That being said, there are several different kinds of cards available - canvas, vellum, illustration board, linen canvas, water color paper, light and heavy weight card stock and some others that art stores carry.


As for watercolor paper: I've done it 2 ways:

1. Premade/cut watercolor paper - its great b/c you don't have to cut them - obvious, but true.  Sold at art stores in a pack of 10-12 for $2.75 to $3.00.
Each one is its own mini masterpiece.
You can do a set all in the same color, so you don't have to clean the brush.
You can do them all different colors.

2. A big sheet or two of water color paper - the disadvantage is that you have to cut them all up later; a paper cutter is very helpful for this - if you were a scrapbooker, you have one.  If you get one, I'd recommend the Cutterpede by EK company.
You can paint the whole thing at once in one go.  
Its neat to see it cut up - different cards get different parts of the whole.


ATC's - general info.

1. Some people make a similar styled card for every card - this makes it easier b/c you can get a little bit like an assembly line and get good at making them.  When I've done this, there are small differences as you figure out better ways to do things.

2. Some people make a different card for every ATC.  I've done this - it can be really fun to do, but takes more time sometimes.  It helps you use all of your rubber stamps if you bought them, but haven't used them yet!

3. Some people just draw a different picture on every card - these people are usually very talented and when I look at the ones I've gotten - they are really interesting and cool.

4. You can make them with fabric or paper or any mixed media combination.  When stitched, I stitch a second card to the back to cover up the stitch lines - I zig zag or satin stitch the edge.
 

Other info:
1. There are special ATC rubber stamps that you can use to stamp on the back of the card to tell all the info of the event, date, name of card or series, blog and email address, and who made it.
2. I like rounded corners on my cards.  I've done unrounded and rounded, and I think in many cases, I prefer rounded corners.  There are hand cutters that will cut a round corner.
3. Usually the edges are treated by inking them with Tim Holtz stamp pads and a make up pad, gilding them with a gold, silver or bronze pen, inking with a pen, etc... to give a little border.
4. There can be dimensional features on the card - like fabric, lace, and beads.   I did a Halloween themed card one year with skull beads dangling from a spider web.
 

If you don't know what an ATC is:

https://en.wikipedia.org/wiki/Artist_trading_cards

Artist trading cards (or ATCs) are miniature works of art about the same size as modern trading cards baseball cards,[1] or 2 12 by 3 12 inches (64 mm × 89 mm),[2] small enough to fit inside standard card-collector pockets, sleeves or sheets.[3] The ATC movement developed out of the mail art movement and has its origins in Switzerland.[4] Cards are produced in various media, including dry media (pencils, pens, markers, etc.), wet media (watercolor, acrylic paints, etc.), paper media (in the form of collage, papercuts, found objects, etc.) or even metals or fiber. The cards are usually traded or exchanged. When sold, they are usually referred to as art card editions and originals (ACEOs). 
------------------------------------------------------


Here is a blog post I did on the topic from Feb. 18, 2011 and Jan. 31, 2011 - I'd love a comment on my blog if you have any:


I was out of town for 9 days to Queretaro, Mexico.  More about that soon.  

Its a big birthday month: today is my Birthday.  Happy Birthday also to Jude at Spirit Cloth, and to Mette and Sissel - my art friends in Santa Barbara, CA.

For the last 2 1/2 days, I've been working like crazy on my ATC cards for the Las Vegas Art and Soul trade.  Sally Jo finished hers yesterday, and I finished mine today.  We had started a few weeks ago by doing the water color back grounds.  Then we added layers of stamping.


These are Sally Jo's cards. She used gesso and a stencil to get the beautiful Japanese flowers. Then some torn foil paper with stamped Chinese words. A bit of gold leafing here and there for the final touch.


The theme this time was "In the Garden with Art and Soul".
Sally Jo had 3 themes: Garden Time, Dream Garden, and Steps to my Garden (with the numbers).


Here are her lovely water colored backs with the ATC info.


Here I am stitching the lace and birds on my cards.


I loved the variety of watercolor back grounds and playing with the stitching on the birds.


Some of our favorite birds and watercolor back grounds.


12 finished cards ready to ship to Marie in CA for the trade.
Each card was stitched to a back card done in watercolor and containing the ATC info.
The title of my cards: My French Garden.
Enjoy the flight little birds!  


Monday, January 31, 2011

Getting Ready for Art and Soul

Hello!  I just bought my ticket to go to Las Vegas in February for the Art and Soul retreat. http://www.artandsoulretreat.com/index.html  Sally Jo and I have been to 3 Art and Soul retreats now and they have all been such a great learning opportunity.  We have been to 2 in Portland, and 1 last year in Las Vegas where we stayed at the Paris hotel on the strip.

We have participated in the ATC (Artist Trading Cards) exchange each time.  This past Oct. in Portland it was a Halloween themed exchange.  We worked together, painting, stamping and stitching to get our cards ready: 25 of each kind.  We made pumpkin cards with batik fabric sewn on for the pumpkin, leaves and stems.  The other set was orange and pink with spider webs sewn on and beads hanging with a little skeleton head on each one.  The edges were all stitched and our info was on the back.  It actually took quite a long time to complete these - staying up until 2-3am to finish it up the day they were due!  Each one was a little bit different.  Unique art pieces.
Sally in class making a picture frame that turned out quite nicely.

 
 Here I am working on a mosaic collage that I painted, inked the sides, and painted all the little tiles on.  Then you pick little found objects to attach to it.  I have an old bulb - perfect shade of turquoise, some old dice, a ringed rock, the head of a dog found in the Willamette or Columbia river by a diver who looks for old lost objects, and a watch makers tin with an old watch face on the front.  Still looking for 2 other objects to place on the remaining tiles.

Wednesday, September 25, 2013

My Artsy Name Tag

I'm preparing for my trip to Mexico and the art retreat in San Miguel de Allende called Pilgrimage in Paint with Katie Kendrick and Judy Wise, organized by Rebecca Brooks.  Five of my best friends (Sally, Lulu, Jan, Diane, and Cindy) are all traveling with me to attend the retreat and to travel around Mexico to soak up the culture, the folk art, festivals and history.  It will be one of the most wonderful trips I've been on because I'm going with these amazing women that I just adore.  There is nothing better than art, photography, creating, travel, history, beautiful towns and great friends.

So here is my start: my name tag.  
We are all making one to wear down there,
 and I plan to use this at my future art retreats too, so it will be well loved.
There is a pocket in the middle for little findings or Milagros.


Sunday, July 28, 2013

iMadonnari Festival: Santa Barbara 2012

i Madonnari Festival in Santa Barbara 2012

The iMadonnari Festival is held each year in May.  I've been to several of these festivals and love watching the work progress over the 3 day weekend.  Beautiful art by talented people.  

From their website
Madonnari, or street painters, transform the Mission plaza using pastels on pavement to create 150 vibrant and colorful, large scale images. We are proud to be the first to bring this romantic festival to the western hemisphere from our sister festival in Grazie di Curtatone, Italy. The festival benefits the Children's Creative Project, a nonprofit arts education program of the Santa Barbara County Education Office. The Project serves 50,000 children in more than 100 schools with visual and performing arts workshops and performances throughout Santa Barbara and San Luis Obispo counties. 

The pictures are either original works or copies of paintings.  Its all done in pastels on the pavement in front of the Mission.  After the weekend, they are left in front of the Mission for people to wander over.  
You can see small leaves and branches have already fallen on some of them.


Artists working on a face drawing.


A picture marked with the grid to be drawn with chalk.


The chalk drawing above is based on the artist's drawing below.


One of my favorites based on a Mucha picture.


Each spot has a sponsor.  
Some sponsors are schools, and kids from the school work together to create the pictures.


This woman was drawing a picture of her son at the beach, based on a photograph.


The theme here was travel to foreign countries like Thailand.


Every year this man does a current picture of his kids.  You can watch them grow up over the years.


This was a featured artist who does drawings at chalk festivals all over the states and in Europe.  
Her 3-D pictures are very popular.


One artist is picked each year to be the featured artist.  They get to do their work in a large area right in front of the steps that lead up to the Mission.


Where the Wild Things Are - featuring this woman's granddaughter.


Sally and Janet at the Mission.


Steve Jobs memorial drawing.


Posters of great drawings from past years.


Fresh food and entertainment is provided next to the Mission for festival goers.


Cool and delicious Gelato!


The artist and her work.


                  An artist who comes every year from San Diego with the most fabulous hat!


Both these ladies are working on this picture, and the artist on the right is also the model in the picture.


The artist with her son, who is shown in the chalk drawing.


Flowers from Santa Barbara.


Peonies and lace from my friends Mette and Sissel's home.


A wonderful trip!  Santa Barbara is my favorite place to visit.